

-
DIY Air-Dry Clay Christmas Ornaments: Easy, Elevated + Perfect for Gifting
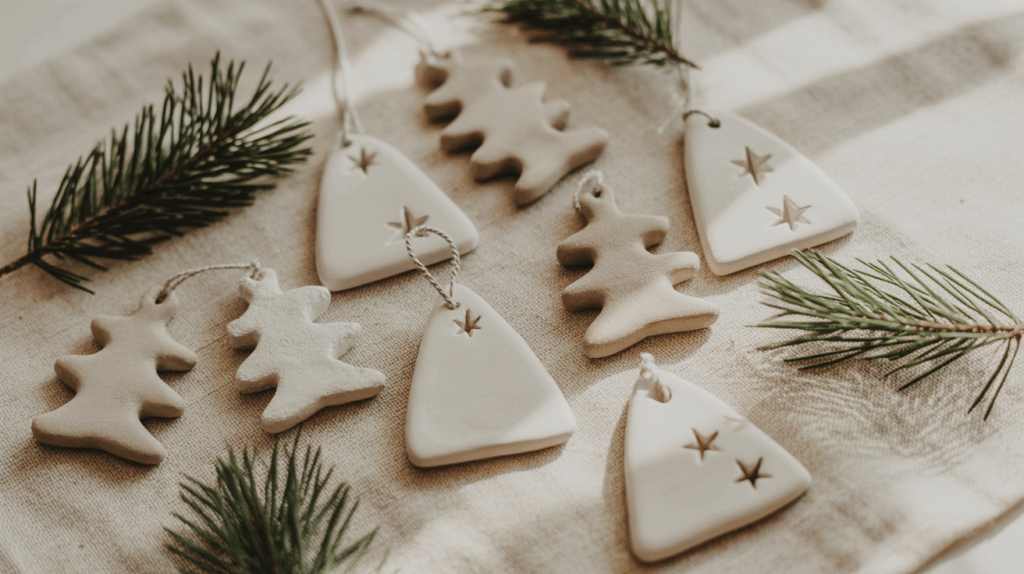
Holiday magic doesn’t start in December — it begins the moment you decide to make something by hand. These easy, boutique-style air-dry clay ornaments are beginner-friendly, affordable, and perfect for batch crafting, gifting, or making keepsakes with kids and grandkids.
Whether it’s October, July, or the middle of winter, it’s never too early to make handmade gifts and décor. Starting now means less stress later — and these air-dry clay ornaments are the perfect first project.
They’re simple, affordable, and beginner-friendly. Even better, they look like something from a high-end boutique. You can batch them in a weekend, make them with kids or grandkids, or start a tradition of gifting a new handmade ornament every year.
If your goal is thoughtful gifting, handmade wrapping accents, or designer-level tree décor, this project checks every box.
Disclosure & Content Note:
This post may contain affiliate links. If you click through and make a purchase, I may earn a small commission at no additional cost to you. Every recommendation is something I genuinely believe adds value and aligns with the Smart Insider lifestyle. Portions of this article were created with the assistance of AI tools and then carefully reviewed, edited, and fact-checked by me to ensure accuracy and authenticity.
Why Air-Dry Clay Works for Everyone
Air-dry clay is one of the easiest holiday crafting materials. There’s no kiln, no baking, and no complicated setup. Cleanup is minimal, the finish is smooth and modern, and you can personalize each piece as much or as little as you like.
Whether you’re decorating a tree, wrapping gifts, hosting a craft night, or filling a gift closet early, these ornaments store beautifully until the season arrives.
What You’ll Need
- Air-dry clay
- Rolling pin or smooth glass
- Cookie cutters (trees, stars, snowflakes, hearts, bells)
- Straw or skewer for ribbon holes
- Stamp letters, texture rollers, lace, or greenery
- Acrylic paint, metallic markers, or gold leaf
- Ribbon, velvet, jute, or twine
- Optional: matte clay sealant
Step-by-Step: How to Make Air-Dry Clay Ornaments
- Condition the clay
Knead for 1–2 minutes until soft and workable. - Roll it out
About ¼-inch thick for the strongest ornaments. - Cut your shapes
Cookie cutters keep them consistent and clean. - Add texture or detail
Press lace, leaves, or stamps into the surface. Names, dates, and initials make wonderful keepsakes. - Make the ribbon hole
A drinking straw creates a neat, perfect opening. - Dry for 24–48 hours
Flip halfway through for even curing. - Refine the edges
Light sanding removes roughness for a polished finish. - Paint or seal
Keep them white and minimal, or add color, metallic accents, or gold leaf. - Add ribbon or twine
Velvet feels luxe, twine feels rustic, and thin leather feels modern.
Decorating Styles That Look Expensive
Minimal Scandinavian
- White clay
- Stamped initials or dates
- Jute or leather cord
Simple, modern, and timeless.
Gold Leaf Edge
- Brush adhesive along the edge
- Press gold leaf
- Seal for a boutique finish
Nature-Pressed
- Press pine, rosemary, or ferns into the clay
Creates organic, botanical detail
Kids’ Keepsake Version
- Fingerprint “light bulbs”
- Painted snowflakes
- Baby handprint ornaments
Why Starting Early Is Smart
Make a few ornaments each month and, by December, you’ll have:
- Gift tags ready
- Teacher gifts prepped
- Neighbor and hostess gifts done
- Custom décor for your tree
- A keepsake collection building year after year
No last-minute rushing. No overspending. Just beautiful, thoughtful results.
Insider Shortcuts
- Roll clay on parchment to prevent sticking
- Use popsicle sticks as guides for even thickness
- Smooth cracks with a wet fingertip
- Store unused clay in a sealed bag so it doesn’t dry out
Ways to Use Your Ornaments
- Hang on the tree
- Tie onto wrapped gifts
- Add to wine bottles as a hostess gift
- Create a mini garland
- Label stocking hooks
- Use as personalized place cards for holiday dinners
Shop This Post
Item Why It’s Great Link Air-dry clay Smooth and beginner-friendly (Add link) Cookie cutter set Classic shapes for batching (Add link) Metallic paint pens Easy gold or silver detailing (Add link) Velvet ribbon Luxe finishing touch (Add link) Matte sealant spray Long-term protection (Add link)
Conclusion
Handmade ornaments always tell a story. Starting early means you enjoy the beauty without the holiday rush.
Whether you make a batch for your own tree or create a collection for gifting, DIY air-dry clay ornaments are a stylish, affordable, meaningful holiday project.
If you make them, tag me or send a photo — I’d love to see your designs.